Sunday, January 13, 2008
Sunday, January 01, 2006
Garbage Mattes


The first thing to do to make life easy is to get rid of some information. Getting rid of information makes the extraction processes alot easier.
A Garbage Matte is just that. You are getting rid of the Garbage so that you can extract the image that you are after.
First, open the pix that you are interested in for the extraction. Make sure to save it as a PSD. You can use any tool that you are comfortable with like one of the Marquee tools, the pen tool will work, or one of the Lasso tools. I use the Polygonal Lasso tool because of the accurate straight lines it produces.
I will be explaining the process using this tool, just so you know.
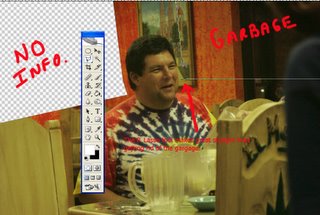
Take the tool and click outside of the picture. You don't want any pixel information on this move. Now, after clicking outside of the picture, take the P. Lasso and go inside the picture up to the image that you are to extract. Do not include the image you are going to extract yet. Remember, you are getting rid of garbage.
Take the P. Lasso tool and go a differant direction and click outside of the picture again, and last, find the starting point of your P. Lasso tool until you get that little circle that lines everything together. You should have marching ants now.
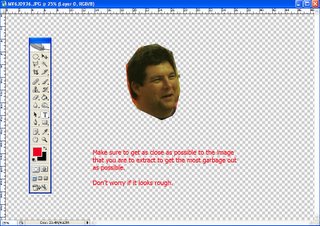
If all goes well, hit the delete button on your keyboard. You should see a checkerboard background. It is important to have the checkerboard and not some other background. Checkerboard means that there is no information to be seen.
If you do not have a checkerboard, go to your layers pallet to the bottom layer. Do one of a couple things.
1) Flatten the image so that there is only one layer.
2) Go to the BG layer, press the ALT key, and double click the mouse to make the BG layer into layer 0, then delete what is in that layer. With the marching ants still active, press delete again on that layer.
Continue getting all the garbage out of the picture, getting as close as possible to the image you are going to extract. Don't worry if the image looks a bit rough, the next few steps will take care of that.
Monday, December 26, 2005
Masks or Mattes
In PS, open up a new folder. In that folder, copy and paste two differant pix on their own layers for this next discussion.
Create a third layer by itself, no image.
Press Alt, then Delete to get a total black box in the third layer. Grab your square horizontal tool and make a square in that layer. You shold see marching ants. In that square press Control, then Delete to make the square white. You have created a matte.
In the drop down blending menu if the blend is normal, nothing is going to happen. But, if you put in Multiply, you get a sample of the second layer.
Levels
Create a layer.
Go to your gradient tool.
Make a black to white gradient.
Open up your levels window.
What you see is the histogram of this gradient.
This histogram shows the population of pixels in the image at any given value.
In a color image what we are looking at is 256 levels of grey in any one channel.
In this histogram since this is black and white there are 256 levels of grey to choose from. 128 is the medium level grey.
When you move the black slider back and forth, the historam is being remapped, pushing twords the white. What used to be dark grey is now black.
And the same with the white slider when moved twords the black. What was light grey is now white.
You can go to the out put slider on the bottom, to set your maximum values. Slide the white levels from 255 to 128, then in the histogram you will only have 50% grey, and nothing in the image will be greater than that. You can do the same thing with the black slider.
Now going from a grey scale image to a color photo, looking at its levels, using the same techniques in the grey scale sample. The image can look really contrasty, really blown, or at 50% grey can look underexposed.
Layers
In the begining I am going to talk about layers, and masks ( mattes ). Later I will get more into upper level tips and tricks.
I use a PC, so I will be talking in PC, not MAC. I am not bilingual.
I will also be using abbreviated words assuming that you the reader will know what I am talking about.
And lastly, I will also assume that you have a basic understanding of Photoshop. I will be mentioning tools and don't want to take the time to really go into them. This blog is not about those tools.
I will edit in screen captured photos later, so this is going to be a work in progress for some time so keep checking back.
Layers are kind of a paine of glass that can be stacked together, one on top of another.
If you go to your eraser tool and click on the background layer in the layers pallet, and start erasing the pix, you will get a white bg. PS is saying that there is a white peice of paper on the bottom.
If you highlight the the background layer and press the alt button and double click your mouse, that bg layer now is layer 0.
Now when you use your eraser tool on the pix, you get a checkered bg. PS is saying that there is nothing there.
You can blend the layers together with the blending drop down menu in the upper left hand side of the layers pallet.
Differant blending options are available from normal, to screen, to hard, light to multiply. Again, I am not really going to go into these features, but I will be talking about certain funtions in this menu that will affect your image extractions.
If you keep your pix in normal mode, you can use the opacity slider, and it will blend layers together.
Tuesday, December 20, 2005
Alpha Channels 101

In photoshop, you can extract images in many, many ways. You can use the extraction tool, which does an ok job. You can hand draw with the pen tool, or the lasso tool. You can use the quick mask. You can use color selection.
All of these methods work fine, but the common denominator to all of these methods is that it is hard to do, requires alot of unnessisary work, and the details are not as good with stuff like hair, trees, ect..
Alpha Channels are way more superior than any other method of extraction of an image.
I am going to give a step by step tutorial on creating Alpha Channels in this blog.